
The ability to assemble and install your own cabinets would save you some money. In case you did not already know, most of the cost of assembling your pieces of furniture goes toward labor! If you give this article half as much attention as it deserves, it can teach you how to install your kitchen cabinets.
This Article Will Cover the Following:
- Selecting wall cabinets
- Preparing the kitchen
- Installing wall cabinets
- Installing base cabinets
- Installing countertops
- Maintaining new cabinets
How to Assemble and Install Your Cabinets Step by Step
How to Select Your Cabinets
The first thing you will need to do is choose a countertop that you will be happy with for years to come. Now that you know the colors, pattern, and texture of your new counter will be less stressful, making shopping for your new cabinets an enjoyable experience.
Keep in mind that this is an area where contrast would work well. If you want your kitchen to be modern, you could go with shaker cabinets. On the other hand, if you’re looking for something more traditional, go with something like cabinets with intricate raised panels.
If you are interested in cabinets that cost a little less and do not mind messing with the flat-packed cabinets, you might want to check out “RTA” cabinets. These will be drastically cheaper than what you would have to pay for the pre-assembled cabinets. This means that you will have to assemble them yourself. By the way, did I mention that the way that flat-packed items somehow create a lot more pieces for you to have to put together also?
How to Prepare Your Kitchen
After making the final decision on the countertop and the cabinets, it is time to prepare your kitchen for your new cabinets. This means that the cabinet system you had will need to be removed, and the RTA cabinets should be assembled. However, the doors on the cabinet should be off during the installation to make the cabinets weigh less, making the process easier for moving and lifting.
Preparing your kitchen for the new cabinets is finding those studs in the walls that will be needed to brace the cabinets to the wall. Once the studs have been located, mark them with an “X,” this way, they will be easy to find later on to connect the cabinets.
Nothing should be left to keep the cabinets from sitting square with the wall. If there is, this would be the time to remove them. This would be the time to trim or remove any floor molding that prevents cabinets from going all the way up against the wall. Also, if you are planning on changing the colors in the kitchen, right now is the time to do so, which will make painting easier since you will not have to slow down (having to be very careful not to get paint on the new cabinets or countertop.
If you intend for your cabinets to be installed under the floor top layer on the subfloor, you will also be cutting a little of the kitchen floor away before installing the cabinets. You need to measure and mark the spots before cutting anything! If a mistake during this process would be challenging to rectify. If removing obstructions proves impossible or just not sensible, this could be a problem! So, it is best to go back to the drawing board and pre-plan. Better yet, consider this before buying your cabinets.
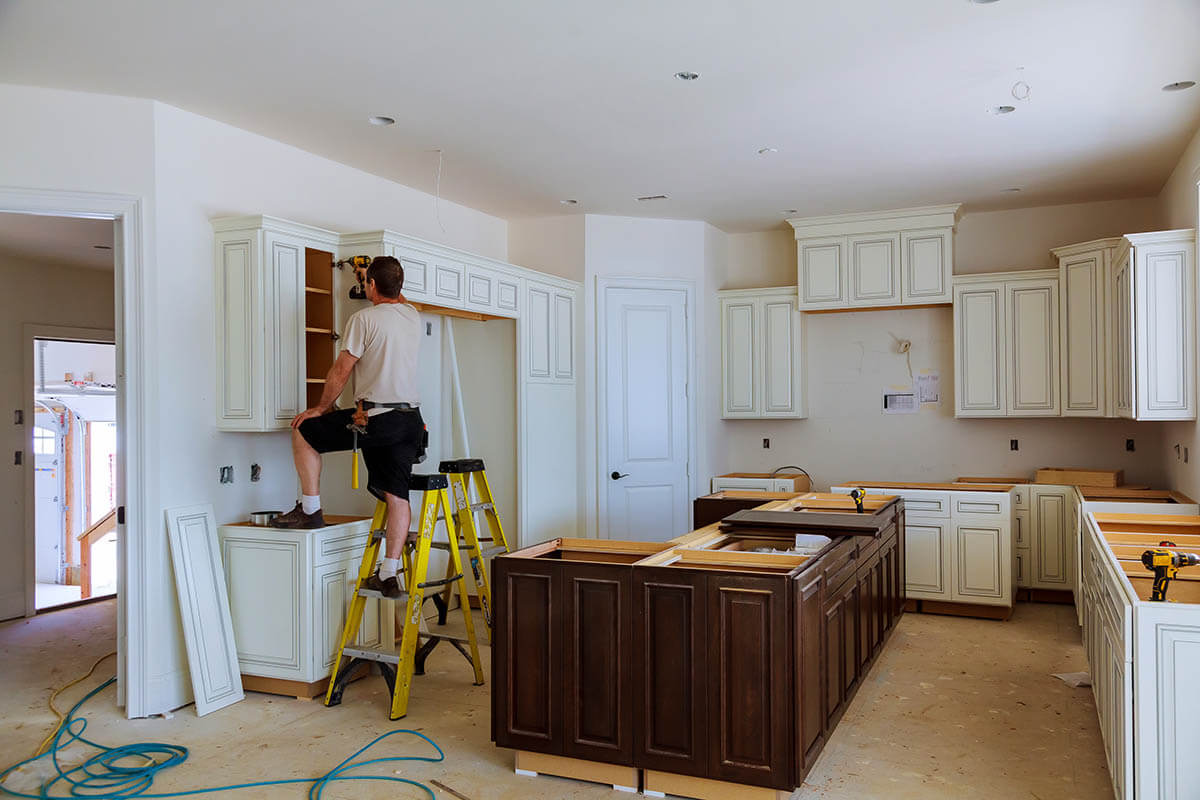
How to Install Wall Cabinets
If you are unsure which cabinets to install first, consider starting with the wall cabinets so that you do not have to work around the base cabinets the entire time.
It is your decision which of the cabinets you want to go up first, but putting in the base cabinets first would mean you would have to work around them to install the wall cabinets. However, starting with the corner cabinet is best so you can extend from there.
Keep in mind that microwave cabinets or bridge cabinets are only aligned at the top because they are made shorter by manufacturers than standard wall cabinets. With that said, those studs should already be marked. However, just in case this is something you forgot, it is something you must do right now, as these studs will support these cabinets!
Now you will want to install a support rail. Take a 2×4 and align it with the 54″ mark. Take a handful of screws making sure it is screwed into the marks on the stud locations that were made earlier. It is of the utmost importance that you ensure the rail is level and stable, do not install the cabinets before being sure.
Everything should be prepared for your first wall cabinet to be installed by now. Whenever a corner wall cabinet is involved, it is best to begin installing it first. Otherwise, the spacing could be minor errors as you are going across the wall. This is where having someone help, or you could instead have another guide rail on the adjacent wall to help lift the cabinet and place. First, pre-drill holes for 1-1/2″ – 2″ in the back of a cabinet or directly into the studs.
Before going to the next cabinet, you will want to make sure the first one put up is entirely plumb and level. Should the cabinet not be plumb, put a shim behind the cabinet and gently tap on it until it becomes plumb. Keep in mind that the cabinets will hold things, so keep checking to ensure it is level. You do not want your cabinets to be too far from the wall.
There is no wrong or right when it comes to what you are comfortable with and what your preference is. You want to ensure that before you start installing your upper cabinets, you have a furring strip to help support the kitchen cabinets and keep them level as you install them. Back the cabinets into the wall and place them on the furring strip. Check that the furring strip is level before placing the cabinets into place.
How to Install Base Cabinets
Your base cabinets will be much easier to install than the upper ones as there is less risk of you getting hurt while installing them. However, it would help if you still were sure that your cabinets are level enough and aligned suitably to get the best results. You will need to start with an end base cabinet to begin your installation. This is the first cabinet that will need to be placed where you want, according to your planned layout. Then, use a level to ensure that the area for the cabinets is even with the others or if you will need shims to level it out. Before you install these cabinets, mark the wall for the bottom cabinets to know where you want them to sit. They should be in line with the upper cabinets.
The cabinet will need to be flush with the wall, similar to the upper cabinet, and put the level on the top. If the cabinet is not level, put shims under it until it is level or in the space between the wall and the cabinet to ensure it is leveled. Drill screws through the back of the cabinet and into the wall studs, securing the bottom and top of the cabinet from sliding or shifting. Make sure the cabinets will stay in place.
Once you have your base cabinet in place, you will need to align each cabinet with the base cabinet. Each one should be level before being secured to the wall studs. Each cabinet should be connected using 2-inch screws at the bottom and top to ensure no gaps between the cabinets.
Take your time and work slowly. The cabinets should be checked frequently to ensure they stay level while being installed. Add shims to keep the cabinets level on the floor and between the wall. Also, the bottom or back of the cabinet may need to be cut out so that any electrical or plumbing lines can be run through them if they are needed for the garbage disposal, dishwasher, or sink connections.
Once you have your base cabinets and upper cabinets in place, you can start adding all of the finishing touches to your cabinets to help fill in any gaps you may have after they have been installed. These filler strips are going to be great for filling in any gaps that you have between appliances and cabinets.
You may also use cabinet trim on the sides and back of the cabinets, but it should only be used to cover small gaps between the floor and the base of the cabinets. Some cabinet trims are self-adhesive, meaning you would only need to peel the backing and stick it to the gap, but you may need fasteners for any other products you use.
Once your cabinets are fully installed, everything is level, and there are no gaps, you can start putting your drawers and cabinet doors on while making adjustments as needed. All the gaps between the wall and cabinet, the cabinets and the floor, and even between the cabinets should be covered.
When you start reattaching your cabinet doors, test them out to ensure that they will open and close without having distance between the doors when they are closed and that there is no overlapping. If unsure, use a level to verify that your cabinet doors are even. If your cabinets are not level, remove and adjust the hinges to straighten the cabinet doors so they will close correctly. Lastly, add your drawers in their tracks and put them in place.
Cost of RTA Kitchen Cabinets Versus Pre-Assembled Cabinets
When it comes to RTA cabinets, you can end up saving more money than assembled or custom cabinets. You will save money in two different ways. The first way is that they are not assembled. Shipping costs are much cheaper than if assembled for you because they are not as big. Then you will be handling the assembly and installation, which means that labor charges are not there, so you are saving even more.
The cost can be different based on what type of cabinet you get. The cost is based on factors like complexity, type of finish, material, and how to put it together. The low-end costs are often made of particleboard, white or coated in melamine, flat-paneled, and unfinished that you will often have to paint yourself.
The more expensive ones will be hardwood, plywood, or solid wood with dovetailed details. The size and accessories and the cabinets’ angles will affect the costs. If you need an odd-sized cabinet, you are looking at costs to be higher, especially if you plan for them to have interior lighting.
How Much Does Cabinet Installation Cost?
According to HomeAdvisor, the national average for cabinet installation ranges from $1,800 to $ 9,350. The average cost of cabinet installation is $5,500.
Hiring a Handyman for Cabinet Installation
Are you still unsure if you can manage to install your new kitchen cabinets yourself? Hire an experienced handyman service in Los Angeles to get the job done correctly and quickly.